| Aspect | Good Zoom Room | Bad Zoom Room |
|---|---|---|
| Camera | Eye level, stable, clear image | Laptop angle, shaky, grainy |
| Lighting | Soft light on face, no harsh shadows | Backlit, blown out, dark |
| Audio | External mic, low echo, low noise | Laptop mic, echo, background noise |
| Background | Simple, clean, on-brand | Clutter, distractions, virtual chaos |
| Internet | Wired or strong Wi-Fi, stable | Weak Wi-Fi, drops, lag |
| Presence | Good framing, eye contact, posture | Looking down, half-face, slouching |
You live on video now. Clients, partners, investors, team, even family. They all judge you based on a tiny rectangle. They do not say it, but they feel it. A clean, pro “Zoom Room” quietly says “I am serious” in every meeting. A messy one does the opposite. That tiny tech setup in your home or office can move business forward or cost you trust. This is why your camera, light, sound, and background are not just tech choices. They are brand choices and, honestly, career choices.
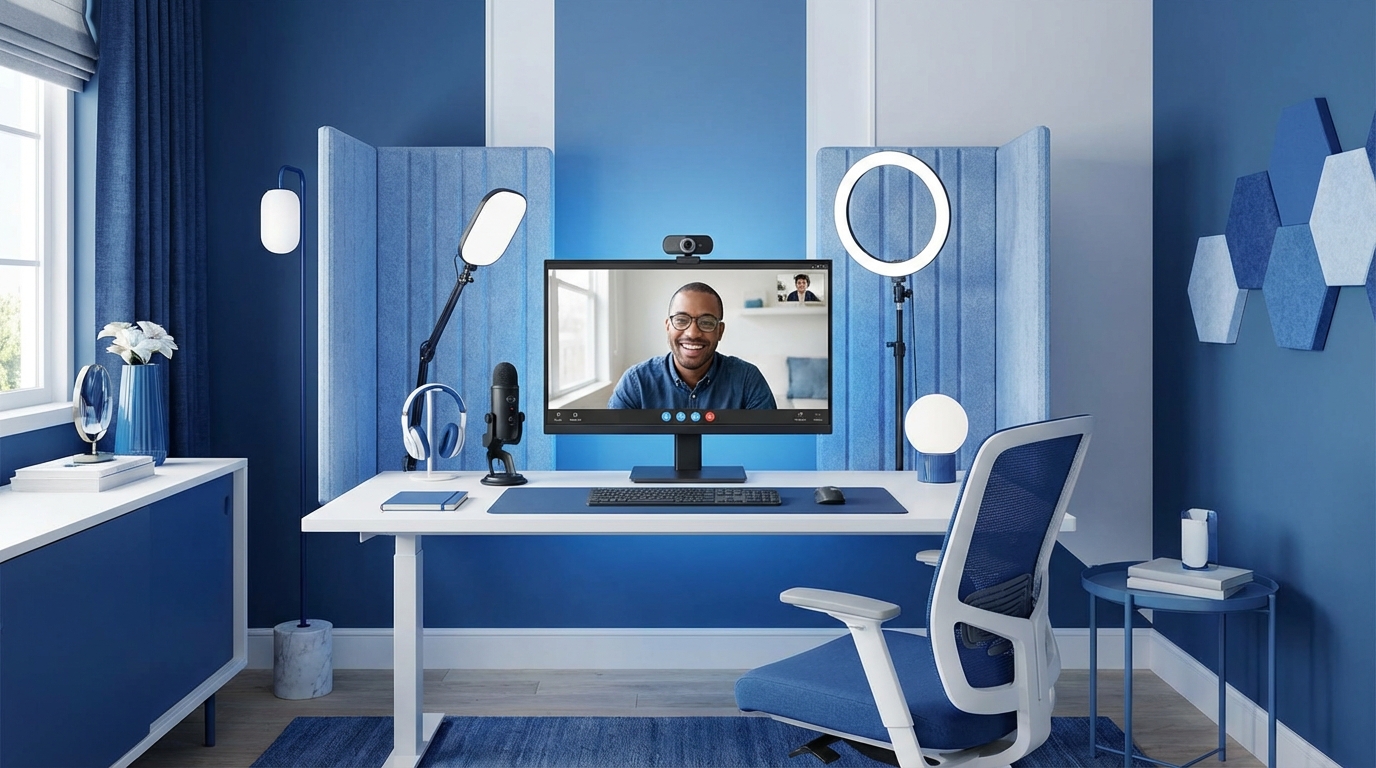
What a “Zoom Room” Really Is for Your Business and Life
A Zoom Room is not just a corner with a laptop.
It is your digital office, your stage, your handshake, and your first impression, all at once.
When someone hops on a call with you, they cannot feel your handshake or see your body in full. They see your face, your eyes, your space. They hear your voice. In that short window, they decide:
– Do I trust this person?
– Do they look like they have their life and business together?
– Do I want to keep talking to them?
You can say “content is king” all day, but on live calls, presentation is right up there with it.
Your Zoom Room is your new office lobby. People judge you before they hear a word of your pitch.
If your video space looks thoughtless, your advice feels less valuable, even when your ideas are strong.
People do not separate your tech from your brand. To them, it is the same thing.
So, when you invest in a Zoom Room, you are not just buying gear. You are shaping how people feel about you in the first 3 seconds of a call. In business and in life, those 3 seconds matter more than most people want to admit.
The 4 Pillars of a Professional Zoom Room
Every strong Zoom Room has the same core pillars:
1. Camera
2. Lighting
3. Audio
4. Background and framing
You can start basic or go advanced. The key is to get all four to “good enough” first, then push to “this feels pro” over time.
1. Camera: Stop Letting Your Laptop Angle Ruin Your Face
Your camera is the closest thing you have to real eye contact online.
If it is too low, too high, or too far, you look strange, not trustworthy, or just tired. People will never tell you, but they will feel a disconnect.
What “good” looks like
For a professional look, aim for this:
– Camera at eye level
– Lens near the top center of your screen
– Your eyes roughly one third from the top of the frame
– Headroom: a little space above your head, not cutting off your hair
– Chest-up framing, not just your face, not your whole body
You want people to look at your eyes, then your hands and upper body when you speak. That is where connection happens.
Laptop webcam vs. external camera
Laptops have better cameras now, but most still flatten your face and struggle with bad light.
If you run client calls, sales calls, or lead any team, an external camera is an easy upgrade. You do not need cinema gear. You just need a camera that looks clean and stable.
Here are three useful tiers:
Starter: Use what you have, fix the angle
If you cannot get any new gear yet:
– Put your laptop on a stack of books or a stand
– Raise the camera to your eye level
– Move closer to a window that lights your face
– Wipe the camera lens with a soft cloth
This alone can double the “quality” perception on your calls.
Practical upgrade: a dedicated webcam
A good USB webcam will usually give you:
– Sharper image
– Better color
– Better low light handling
– More stable focus
You clip it onto your monitor, set eye level, and you are done. That is it. This is the best time-for-quality trade for most people.
High-end upgrade: DSLR or mirrorless camera
This is for you if you:
– Run a YouTube channel or podcast
– Host webinars or paid workshops
– Need content that looks close to TV quality
With a entry-level mirrorless or DSLR camera, a lens with a wide aperture, and a capture card, your Zoom feed can look like a professional studio.
The tradeoff:
– Higher cost
– More setup
– More wires
– More that can break
So, you should only go here if video is a core part of your business or your brand.
2. Lighting: The Cheapest Way to Look More Professional
If you have to choose between camera and light, pick light.
A cheap camera with great light will almost always beat an expensive camera in bad light.
Lighting affects:
– How clear your face looks
– How tired or fresh you seem
– How much your eyes “pop” on screen
– How easy it is for people to stay engaged
The basic rule: light your face, not your background
You want light that:
– Points toward your face
– Is slightly above eye level
– Is soft, not harsh
– Comes from in front of you, not behind you
Backlight from windows behind you will turn you into a silhouette. This is the classic “I cannot see your face” problem.
Natural light setup
If you have a window, that is your new best friend.
– Face the window, do not sit with it behind you
– Sit about 3 to 6 feet away, depending on brightness
– Slight angle helps, so the light is not flat and boring
– Add a thin white curtain if the light is strong
This costs nothing and often beats cheap lamps.
Artificial light setup
For more control, add simple lights:
– One key light: your main light in front of you, at a slight angle
– One fill light (optional): softer light on the other side of your face to soften shadows
– A small background light (optional): to add depth behind you
LED panels or ring lights are common here. Aim for:
– Adjustable brightness
– Adjustable color temperature (you can match daylight or warm light)
– Mounted on a stand at or above eye level
If your walls are white or light colored, you can bounce light off the wall or ceiling for a softer feel.
Color temperature: warm vs. cool
You want your lighting to match your environment:
– Warmer light (around 2700K to 3500K) feels more relaxed, like a home or cozy office
– Cooler light (around 5000K to 6500K) feels like daylight, more alert, sometimes more clinical
Try to keep all light sources in your room within a similar range, so your face does not look odd. Mixed color temperatures can make your skin look strange.
3. Audio: People Will Forgive Bad Video, Not Bad Sound
If people cannot hear you clearly, they will check out mentally.
On business calls, sound affects:
– How credible you seem
– How tiring you are to listen to
– How professional your space feels
Technically, someone could tolerate grainy video if your ideas are strong. Bad audio, though, feels like more work.
Never rely on the laptop mic if you can help it
Laptop mics:
– Catch keyboard noise
– Catch room echo
– Change in quality when you move your head
You do not need a studio mic. You just need any mic that is closer to your mouth than your laptop.
Easy audio upgrades
Here are solid paths based on how you work.
1. Wired earbuds with mic
– Cheap, simple
– Mic is always near your mouth
– Less echo, fewer room reflections
– Works well for travel and quick calls
Downside: wires can be annoying on camera.
2. USB desktop mic
A USB mic on a small stand in front of you can give you:
– Warmer, cleaner sound
– Less background noise, if placed well
– Stable position
Place the mic about 6 to 10 inches from your mouth, slightly off to the side, not blocking your face.
3. Headset mic
If you:
– Move your head a lot
– Need consistent sound as you shift
– Work in noisier environments
A headset with a boom mic gives you stable audio. The look is a bit more call-center style, but for internal calls or coaching, it is often fine.
Managing echo and noise
Even a good mic will sound poor in a hard, empty room.
You can soften sound by:
– Adding a rug or carpet
– Hanging curtains
– Adding bookshelves, soft furniture, plants
You are not building a studio. You are just stopping your voice from bouncing off bare walls.
Most video tools now have noise suppression features. Use them lightly. They help with fans, minor background noise, but they can also flatten your voice if overdone.
4. Background and Framing: Your Brand Is in the Details
Your background says as much about you as your clothes.
Messy background, messy mind. People will not say it, but they think it.
You do not need a perfect studio. You just need intention.
Pick a simple, stable background
Options that work well:
– Clean wall with one or two things behind you
– Bookshelf with a bit of space, not stuffed
– Simple artwork
– A plant or two
– A small branded item: logo, book, product, or something personal
Avoid:
– Visible laundry
– Open closet doors
– Busy patterns behind your head
– People walking through the background
Your background should be quiet. It should support the conversation, not hijack it.
Real background vs. virtual background
Virtual backgrounds are tempting, but they often create awkward outlines around your hair and hands. That can look cheap or distracting.
Use a virtual background only if:
– Your real space cannot be cleaned up
– You have enough light and a plain wall
– You choose a clean, subtle image (no fake beach, no loud scenes)
Blurred backgrounds are often a better compromise. They hide distractions while keeping you real and grounded.
Framing your shot
Here is a simple way to think about framing:
– Your eyes at about one third from the top of the frame
– Shoulders and upper chest visible
– Space on each side of your head
– Do not cut off your chin
If you tend to move a lot, give yourself a little room in the frame so you do not disappear out of shot.
Designing Your Zoom Room Space Step by Step
Let us put this into a simple build plan you can follow, even in a small apartment or a shared office.
Step 1: Choose your location
You want a spot that balances three things:
– Access to power and internet
– Control over noise
– Control over light
Ask yourself:
– Can you close a door?
– Are there loud neighbors, kids, or traffic?
– Is there a window you can face?
– Can you reach a router for wired internet if needed?
Often, the “best” Zoom spot is not your main desk. It might be a corner you set up just for calls.
Step 2: Fix your internet first
Great video means nothing if your call freezes.
Stronger options:
– Wired connection with an Ethernet cable to your router
– Sitting closer to the router, not across the house
– A better router or mesh system if you share with others
Aim for:
– At least 10 Mbps upload speed for stable HD calls
– Consistent connection across the day
Run a few speed tests at different times. If your upload speed is low, your video will suffer.
Step 3: Set up your camera at eye level
Once you pick your spot:
– Place your laptop or monitor where it feels natural
– Mount your camera at eye level
– Adjust the distance so your head and shoulders fill the frame
If you use a laptop:
– Use a stand or stack of books
– Add an external keyboard and mouse so you are not typing at a weird angle
Think of your camera as another person in the room. You want to talk to it like you talk to someone across a table.
Step 4: Design your lighting
Stand or sit where you will be on calls and take a test shot.
Ask yourself:
– Is my face evenly lit?
– Are there harsh shadows on one side?
– Do I have strong light behind me?
If your face is dark:
– Move closer to a window and face it
– Add a light in front of you at a slight angle
– Turn off strong backlights that compete with your main source
If your face is too bright and washed out:
– Move a little further from the light
– Lower the brightness
– Soften it with a diffuser or light cloth
Test again on your actual video app. What looks fine in your phone camera may look different in Zoom.
Step 5: Manage your background
Look at your video feed with a critical eye.
Ask:
– What is the first thing my eye goes to?
– Does anything behind me move or flicker?
– Is there clutter that pulls attention?
Remove items that do not need to be seen.
Then, add one or two elements that make the space feel human:
– A plant
– A few books
– A framed print
– A neat shelf
You do not need more than that. You want “intentional,” not “Instagram backdrop.”
Step 6: Dial in your audio
Connect your chosen mic or headset.
In your video app settings:
– Pick the correct mic
– Turn on echo cancellation
– Talk at your normal volume and test the levels
Say a few sentences and record yourself. Listen back:
– Can you hear background noise?
– Do you hear a strong room echo?
– Do certain sounds feel harsh?
Move the mic closer or farther until you sound natural. Small changes here can feel huge to the person listening.
Step 7: Save your settings and make them repeatable
You do not want to rebuild your Zoom Room before each call.
Mark or lock in a few things:
– Tape on the desk where your laptop or mic should sit
– Fixed camera height
– Light stands that stay in one place
– Audio settings saved in your apps
Your goal: sit down, hit “join,” and know you look and sound the same every time.
Adapting Your Zoom Room to How You Work
Your ideal setup depends on your role and your goals.
If you are a founder or executive
You are selling vision, trust, and stability every time you speak.
You care most about:
– Consistent, clear video and audio
– A background that feels calm and serious
– Good eye contact and posture
Your space should feel like a modern, tidy office, even if it is one corner of your home.
Invest in:
– A solid external webcam
– A simple key light
– A USB mic
– Wired internet if possible
You do not need fancy gear. You need zero friction during high-stakes calls.
If you are a coach, consultant, or service provider
Your Zoom Room is your practice room, your consulting office, your stage.
Clients buy your presence as much as your expertise.
You want:
– Warm, welcoming lighting
– A background that reflects your niche
– Clear, non-distracting sound
For example:
– A health coach might have plants, soft light, and a calm color palette
– A marketing consultant might show books, a whiteboard, and a few framed pieces
When your space reflects your work, you lower the trust barrier. People feel “this is the right person for me” faster.
If you create content on camera
If you record podcasts, webinars, or courses, your Zoom Room needs to double as a light studio.
Key focus areas:
– Camera quality
– Lighting consistency
– Sound quality
Think about:
– Repeatable lighting you can turn on and off easily
– A shot composition that works for both live calls and replays
– A second angle if you want more advanced content later
In this case, a better camera and a controlled audio setup pay off quickly.
If you have limited space
Many people do not have a spare room. They have a corner of a bedroom or living room.
You can still build a strong Zoom corner:
– Use a small desk or wall-mounted shelf
– Face a window
– Use a foldable backdrop or curtain behind you if the room is messy
– Mount a small light to the wall or clamp it to your desk
– Keep your mic and webcam small and movable
Your Zoom Room does not have to be huge. It just has to be consistent.
Presence: The Human Side of a Tech-Driven Room
You can buy all the right gear and still come across flat on camera.
Your presence is part of your Zoom Room. Tech supports it, but cannot replace it.
Eye contact and where you look
Most people stare at the video feed, not the camera. To others, this feels like you are looking slightly away from them.
You do not need to stare at the lens the whole time. That would be strange. But you can:
– Look at the camera when you start the call and greet people
– Look at the camera when you make key points
– Glance at the feed when needed, then return to the lens
Think of the lens as the eye of the person you are speaking to.
Body language and framing
Because people only see part of you, small things matter more:
– Sit up, do not collapse into your chair
– Keep your shoulders relaxed
– Use your hands naturally where they can be seen
– Nod or respond visually when others speak
This makes calls feel more like real conversations and less like voiceovers.
Sound of your voice
Microphones can exaggerate small speech habits.
On calls, try to:
– Speak slightly slower than you do in person
– Leave small pauses so others can jump in
– Vary your tone, do not stay completely flat
– Lean in slightly when you want to stress a point
If you record one of your calls and listen back, you will catch patterns you can adjust.
Linking Your Zoom Room to Your Tech Stack
Your Zoom Room is not a stand-alone project. It should plug into your overall tools for work and life.
Calendar and scheduling tools
Your Zoom Room is most useful when it works smoothly with your scheduling:
– Connect Zoom or your video tool to your calendar
– Use scheduling links so meetings auto-generate video links
– Block time on your calendar to reset your space if needed
This protects your energy and keeps your Zoom Room ready for each call.
Recording and repurposing content
If your calls often include training, coaching, or sales pitches, your Zoom Room can be:
– Your content recording space
– Your course studio
– Your client testimonial studio
You can record:
– Short clips for social channels
– Snippets of coaching (with permission) for marketing
– Internal training videos
The better your setup, the more usable every recording becomes.
Hardware and backup plans
Tech fails sometimes. It just does. You do not need a full backup office, but you can set light safety nets.
Simple backups:
– A cheap wired headset if your main mic fails
– A mobile hotspot or phone tether for emergencies
– Zoom or meeting apps installed on both your computer and your phone
These do not have to be perfect. They only need to get you through a critical call when something breaks.
Growing Your Zoom Room Over Time
You do not need to build a perfect Zoom Room in one day. In fact, it is often better if you do not.
Treat it like your business: iterate.
A simple path:
– Week 1: Fix framing and background
– Week 2: Improve lighting
– Week 3: Upgrade audio
– Week 4: Tweak internet and stability
– Month 2 and beyond: Consider better camera or more advanced layout
Each time, ask people you trust for honest feedback:
– Can you see me clearly?
– Can you hear me clearly?
– Is anything distracting?
Record your own calls once in a while. Observe yourself as if you were a client.
You will see what to adjust next.